Installation guide & product manual

Window Sensor

Battery-free wireless opening detection for compatible outward-opening, inward-opening, tilt-and-turn and top-hung windows.

Battery-free 433 MHz Surface mount 25 m stated indoor range
Product codeAG-OWN-100
SKUAG-OWN-100-WH
Document IDAG-OWN-100-MAN-EN-R01
Hardware revisionV.1
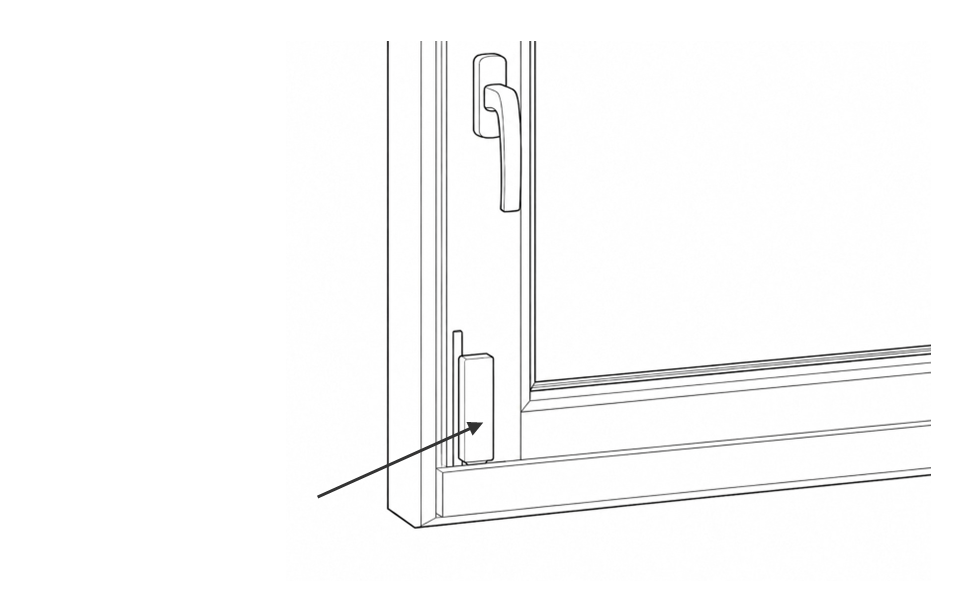
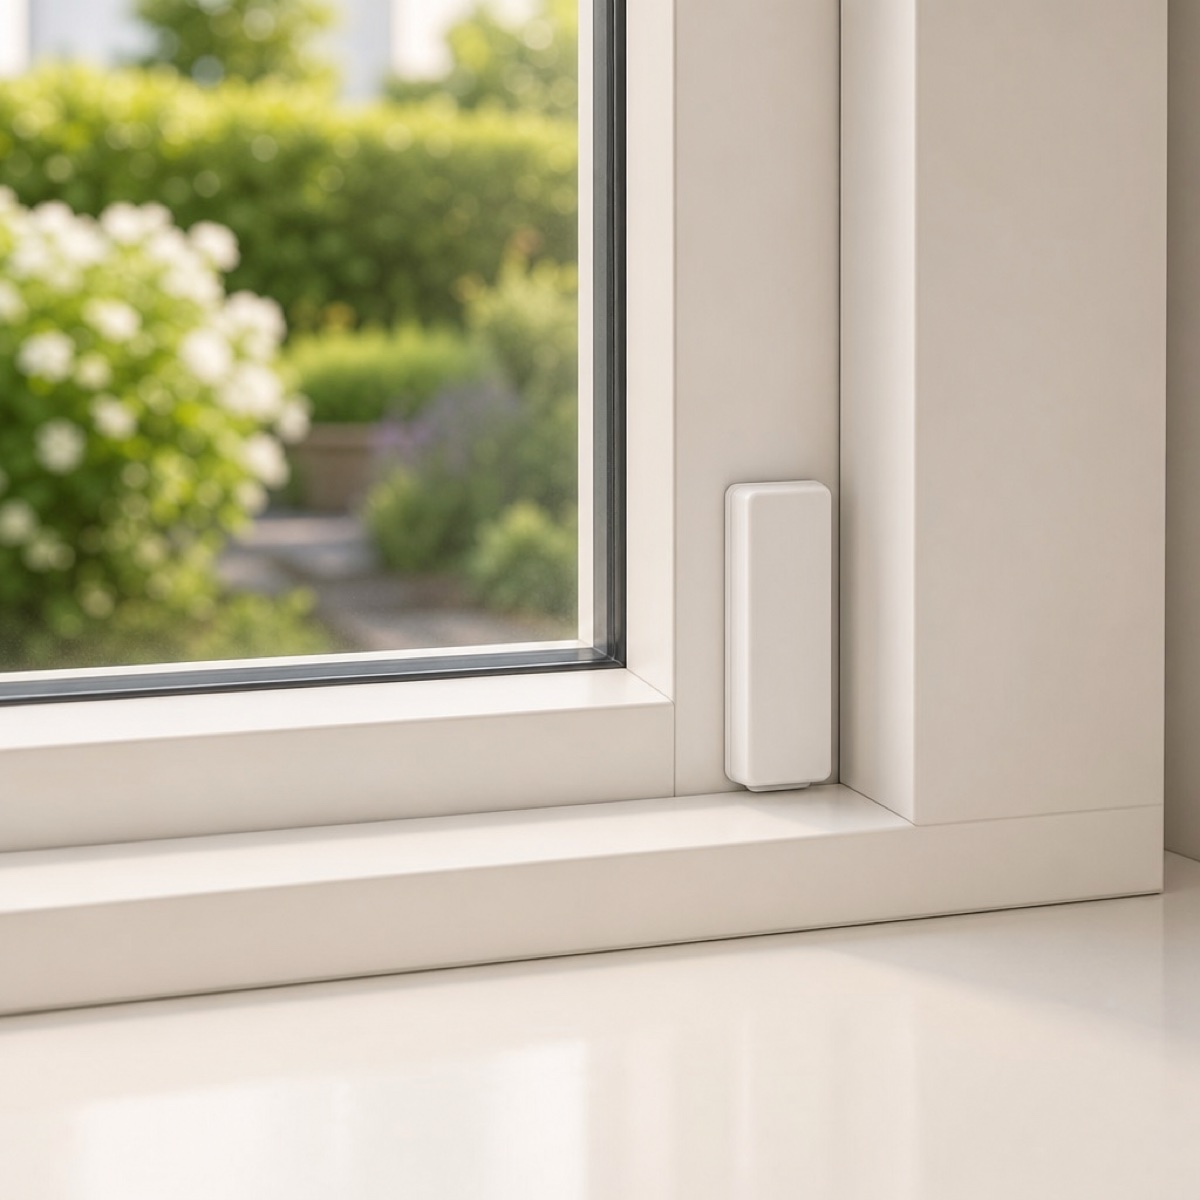
Apeiron Guard Window Sensor installed vertically at the lower corner of a white casement window frame
Standard installation shown Mount vertically on the lower handle-side fixed stile with the triangular actuator facing down to reduce rainwater ingress.

Product overview

Understand the intended installation geometry before preparing the frame.

What the Window Sensor does

The Window Sensor monitors the opening state of a compatible window without a replaceable sensor battery. When the protected window moves from closed to open, the triangular actuator state changes and the opening action provides the electrical pulse used to transmit a 433 MHz event to a compatible Apeiron Guard alarm hub.

The alarm hub can then sound a local alarm and pass the opening event into the Apeiron Guard app workflow.

Installation covered by this guide

This guide covers the approved fixed-frame installation: mount the sensor vertically at the lower handle-side corner, with the triangular actuator facing downward to reduce the risk of rainwater entering when an outward-opening window is open.

The Window Sensor can support outward-opening, inward-opening, tilt-and-turn and top-hung windows when the approved mounting and actuator requirements can be met. For sliding windows, use the Apeiron Guard Door Sensor where the Window Sensor geometry is unsuitable.

Skill levelSecurity installer recommended
Installation timeVaries by site conditions
MountingThin L-base with adhesive tape
System requirementMini Alarm Hub or Wireless I/O Module

Package contents & tools

Confirm the approved package contents and prepare the required installation materials.

Package contents

  • 1 × Apeiron Guard Window Sensor with L-shaped base and pre-applied adhesive tape
  • Packaging-printed QR code linking to this installation manual

Required but not included

  • Compatible Apeiron Guard alarm hub
  • Apeiron Guard app and commissioned system
  • Lint-free cloth
  • Window-frame-safe cleaning solution
  • Low-tack positioning tape or removable pencil mark
  • Optional manufacturer-approved adhesive sealant for additional mounting security

Safety & installation suitability

The sensor is part of a security system; it does not replace physical locks or life-safety devices.

Do

  • Test the radio event at the proposed position before permanent mounting.
  • Use a clean, flat, dry and structurally sound frame surface.
  • Keep the triangular actuator unobstructed and aligned with its contact surface.
  • Verify open and closed operation before handing over the system.
  • Follow the window manufacturer’s cleaning and surface-care guidance.

Do not

  • Never mount the sensor directly on glass, loose trim, flexible seals or a wet/contaminated surface.
  • Obstruct drainage channels, weather seals, hinges, locks or window movement.
  • Drill into, open, paint or modify the sensor enclosure.
  • Use a second magnetic contact block; this Window Sensor is a single-actuator device.
  • Rely on the stated maximum range without an on-site signal test.

Product anatomy

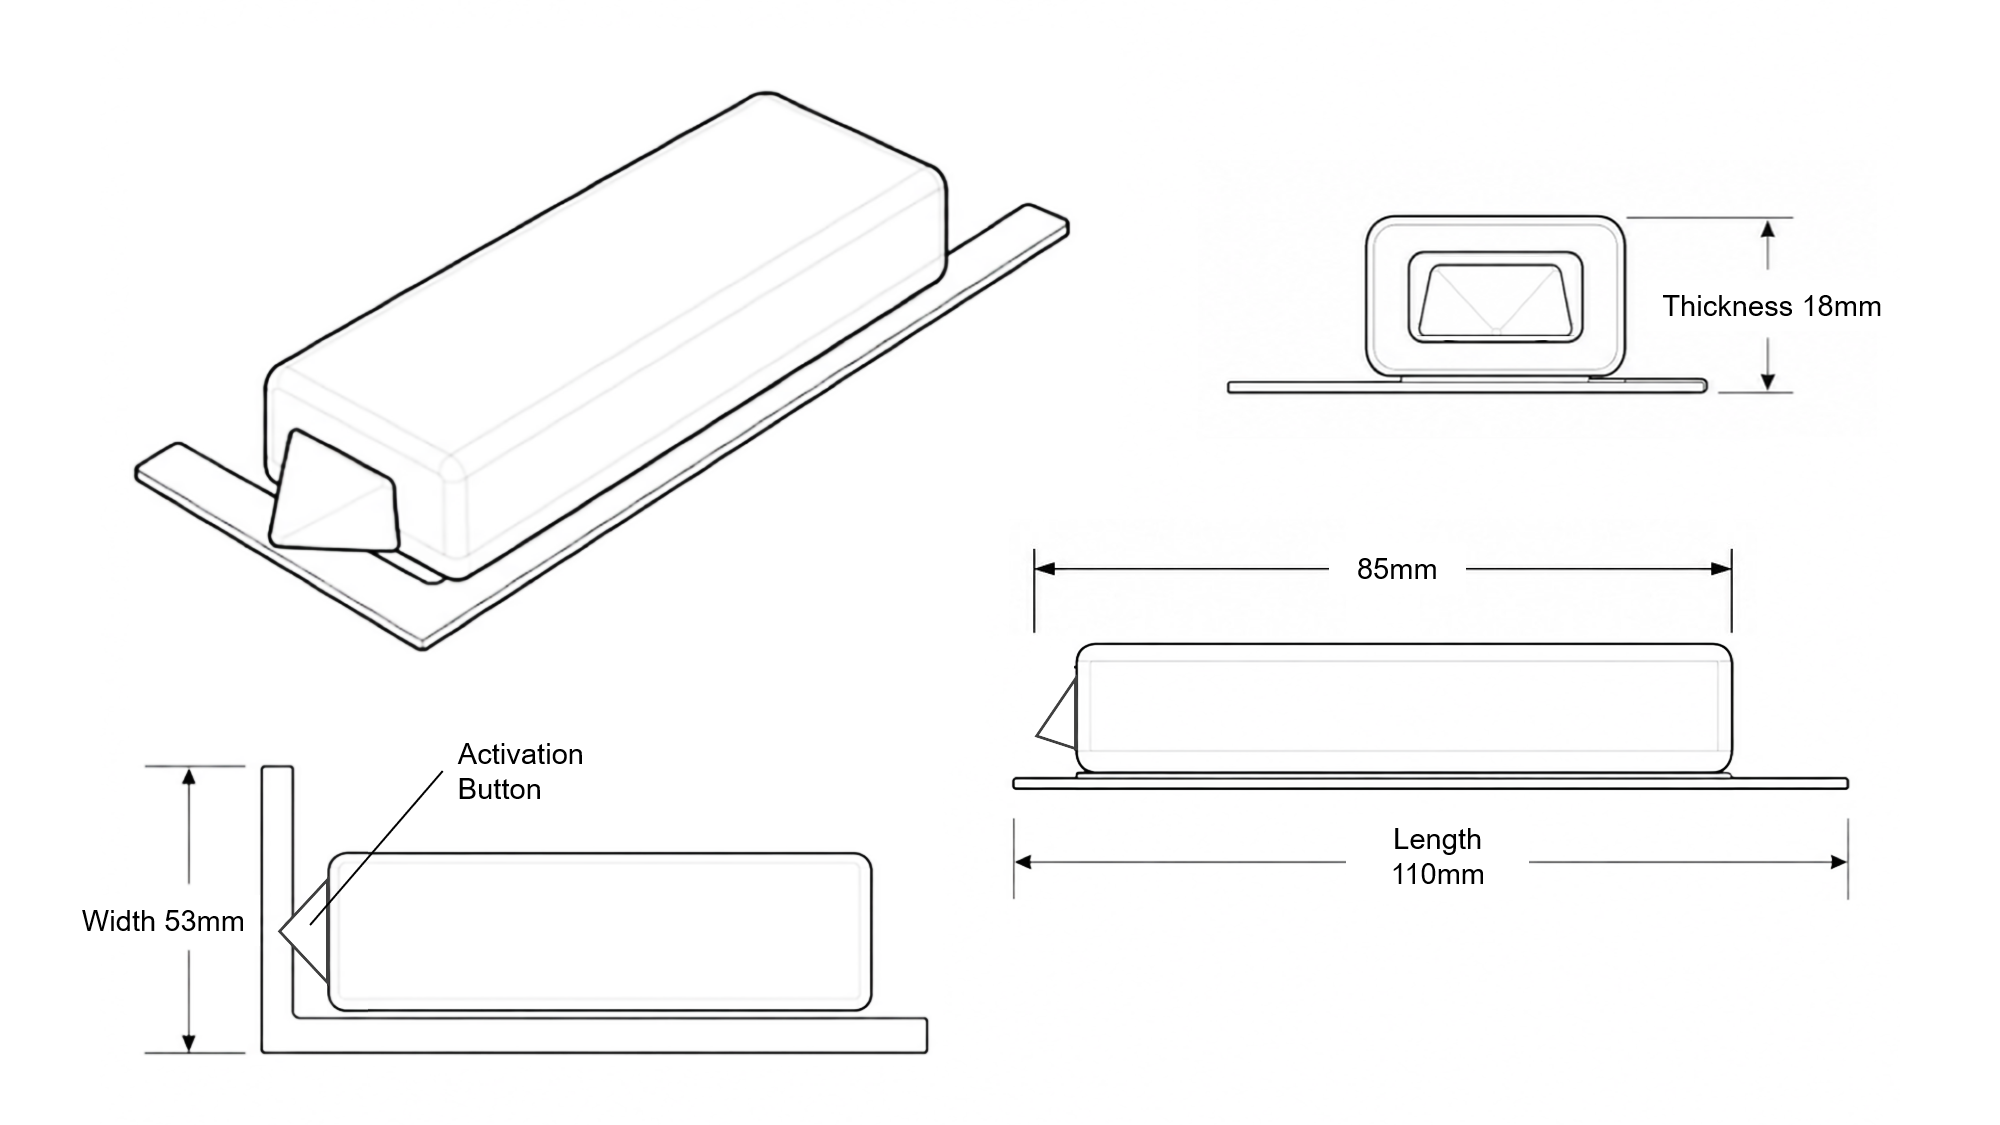
The supplied dimension diagram is the exact visual source for product geometry and scale.

Approved technical dimension diagram for the Apeiron Guard Window Sensor showing the activation button and 110 by 53 by 18 millimetre overall mounting geometry
Product anatomyKevin-approved 2000 × 1125 geometry reference
A
85 mm sensor bodySlim matte-white PC enclosure containing the self-powered wireless sensing mechanism.
B
Activation buttonFaces the contact surface and changes state as the window opens or closes.
C
Thin L-shaped mounting baseSits flush to the stile and adjacent lower edge across the approved 110 × 53 mm footprint.
D
Adhesive mounting faceBonding area follows the two narrow legs of the thin L-base; do not replace it with screws or a bulky bracket.
E
Reference dimensions110 mm length, 53 mm width and 18 mm overall thickness.

Installation steps

Approved six-step sequence for the standard fixed-frame Window Sensor installation.

1

Choose the correct position

Hold the Window Sensor vertically at the lower handle-side fixed stile. The triangular actuator must face downward toward the bottom rail/contact surface to reduce the risk of rainwater entering when the window is open.

  • The sensor body must sit fully on the frame, not on the glass.
  • Confirm the sash can open and close without collision.
  • Confirm the mounting area does not interfere with seals, drainage or locks.
Window Sensor held vertically at the lower fixed window frame in the intended installation position
2

Test the position before bonding

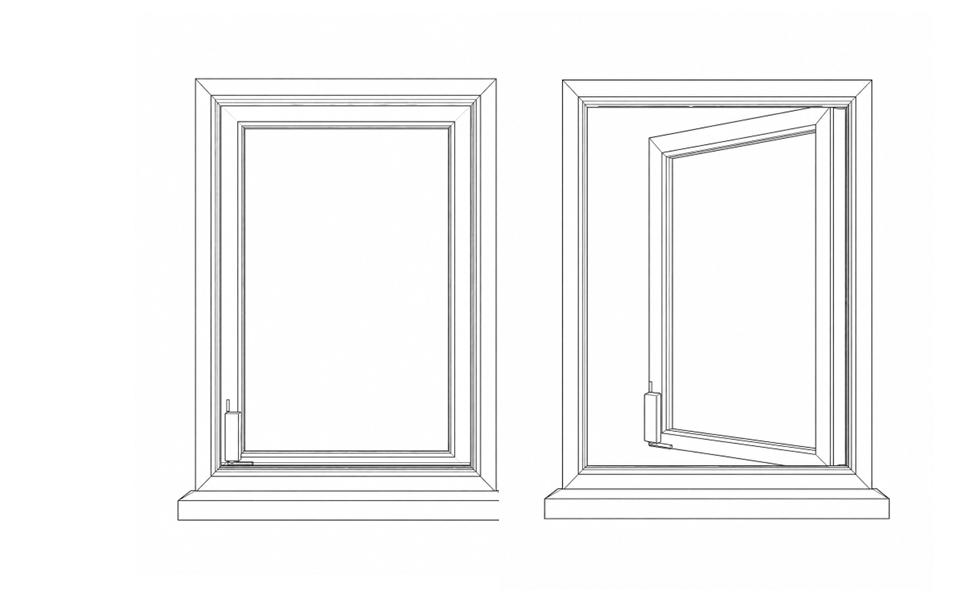
With the sensor temporarily held in position, close the window and confirm the bottom contact surface presses the triangular actuator fully inwards. Open the window and confirm the actuator releases freely.

  • Closed: actuator fully pressed inwards.
  • Open: actuator released and visibly extended.
  • Perform a preliminary event/range test with the hub.
Closed and open casement window comparison for checking the Window Sensor position before bonding
3

Clean, dry and prepare the frame

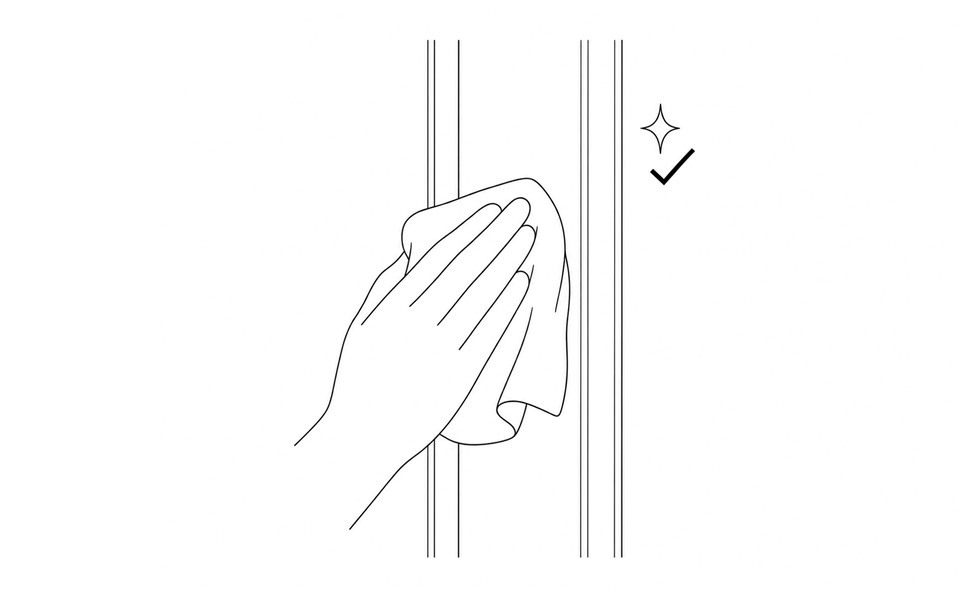
Clean the mounting surfaces using a lint-free cloth and a cleaner approved for the window-frame finish. Remove dust, oil and moisture, then allow the area to dry completely.

  • Do not use aggressive solvents that could damage the frame.
  • Do not apply adhesive over loose paint, silicone, dust or condensation.
  • Mark the approved position lightly before removing the tape liner.
Hand cleaning the Window Sensor mounting surfaces on the window frame with a cloth
4

Align and bond the L-shaped base

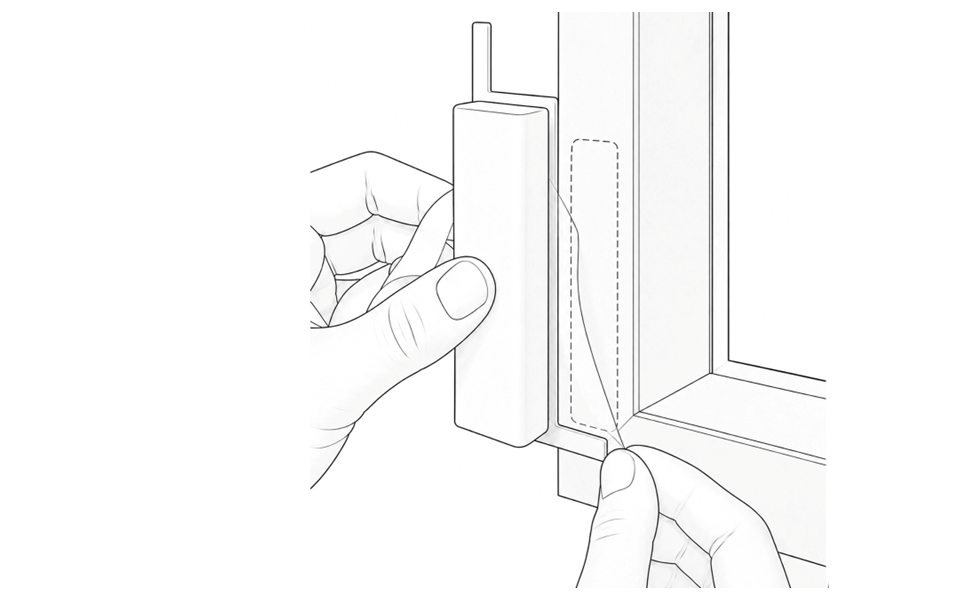
Remove the approved adhesive liner without touching the bonding surface. Align the thin L-shaped base with the marked position and keep the sensor vertical with its triangular actuator downward.

  • Bond once; avoid repeated repositioning.
  • Keep the base flush against both intended contact faces.
  • Use only the specified tape or replacement adhesive.
Removing the adhesive liner while aligning the Window Sensor at the marked mounting position
5

Press firmly and verify engagement

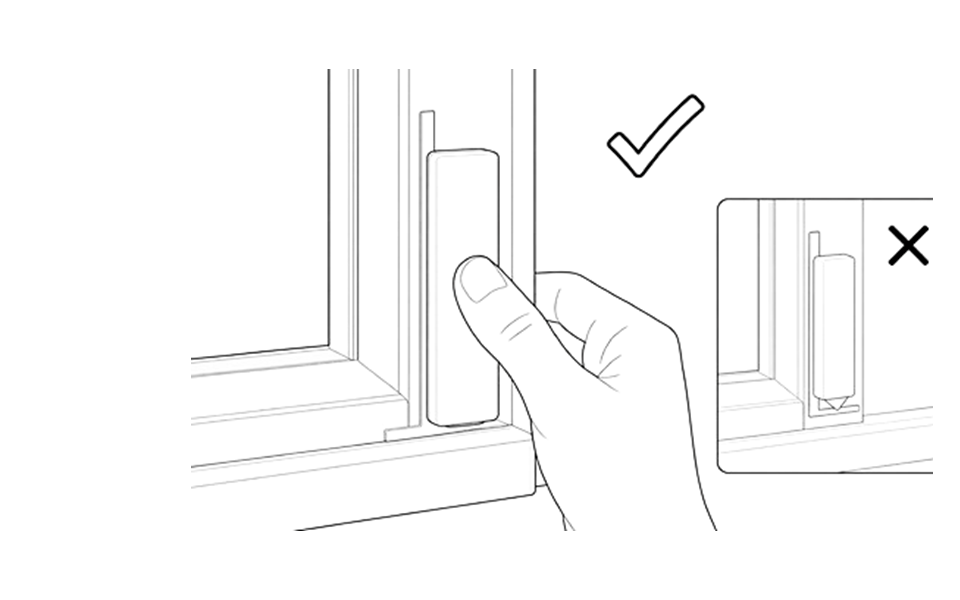
Apply firm, even pressure over the mounting base and sensor body without pressing the triangular actuator sideways. Close the window and confirm the contact surface presses the actuator fully inwards.

  • Apply firm pressure for 30 seconds.
  • Allow 1 minute for full cure before the final functional test.
  • For additional mounting security, manufacturer-approved adhesive sealant may be added around the back after initial placement.
Pressing the Window Sensor firmly into a flush position, with an inset showing incorrect mounting over a gap
6

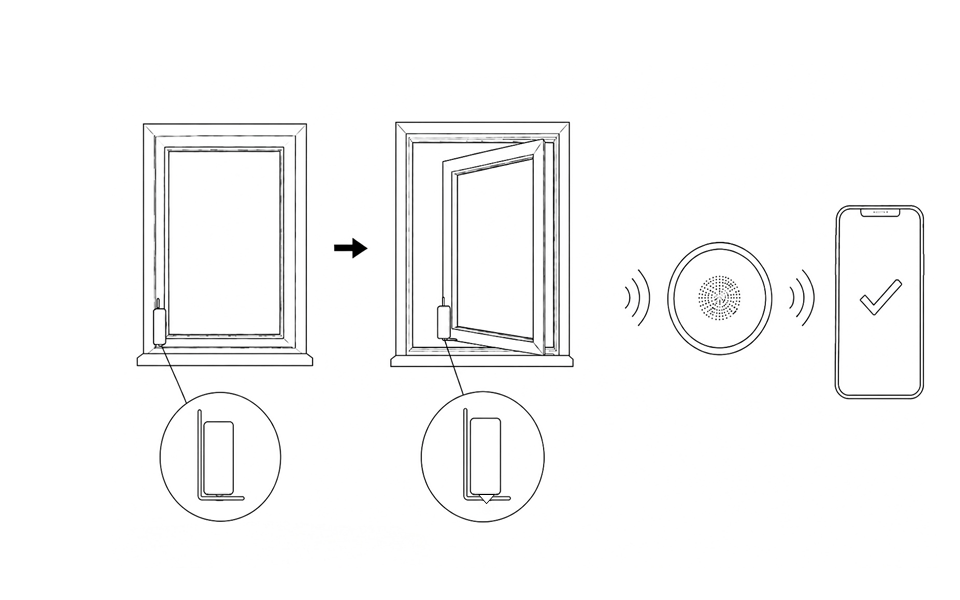
Complete the open/close functional test

Close the window fully, arm or place the system in its approved test mode, then open the window and confirm the opening event reaches the hub and app.

  • Repeat the test at least three times during commissioning.
  • Verify the correct zone/device name appears.
  • Record the final position and test result in the handover document.
Final Window Sensor opening test sending a wireless alert to the Alarm Hub and mobile app

Pairing & commissioning

Use the selected receiver guide, then verify the complete alarm path.

Pair with the selected receiver

Follow the receiver-specific guide for enrollment, zone naming, success indications and removal.

  • Mini Alarm Hub and App setup guide
  • Wireless I/O Module: follow the project-specific wiring and commissioning documentation supplied with the module.
  • Pair and name one sensor at a time.
  • Complete commissioning before customer handover.

Commissioning test flow

01Confirm sensor is enrolled
02Close window and arm test mode
03Open window to trigger event
04Verify hub, app and zone name

Do not permanently hand over the installation until the event is received reliably from the final mounting position.

Normal operation

Use these states to verify both the physical sensor and the connected-system response.

StateWindow SensorExpected system behavior
Window openedThe contact surface moves away and the triangular actuator releases.The opening action generates/transmits a 433 MHz event to the compatible hub.
Window reclosedThe triangular actuator is pressed inward again.The closing action generates and transmits a second 433 MHz RF event.
Armed while openThe sensor remains in the open state when the zone is armed.Reclosing the window transmits an event and triggers the alarm for the armed zone.
Mini Alarm Hub and appNo local control is required at the sensor.The app shows the real-time open or closed state whether the system is armed or disarmed.
Wireless I/O ModuleEach opening or closing action transmits an event.The module response follows the configured integration and zone rules.

Quick troubleshooting

Resolve installation and communication faults before replacing the product.

SymptomLikely causeAction
No event when openedSensor not enrolled, hub unavailable, actuator obstructed, or window movement does not fully release the actuator.Test near the hub, confirm enrollment, inspect actuator movement and reposition if required.
Window appears open when closedThe triangular actuator is not fully pressed inwards.Recheck vertical alignment and contact height. Remount using approved replacement adhesive.
Intermittent alertsFinal location has weak radio conditions, metal shielding or excessive distance.Test repeatedly at the final position and consider hub relocation or system-design adjustment.
Button does not move freelyDirt, adhesive, paint, frame collision or sideways mounting pressure.Remove the obstruction. Do not lubricate or open the enclosure. Replace the product if mechanically damaged.
Adhesive begins liftingContaminated/unsuitable surface, insufficient pressure, premature loading or incorrect replacement tape.Remove safely, clean the surface and remount with the approved adhesive system. Never reuse removed tape.
Wrong device shown in appIncorrect zone/device naming during commissioning.Correct the device name and repeat the complete open/close test before handover.

Technical specifications

Current values from the approved datasheet and dimension diagram.

ItemValue
Product codeAG-OWN-100
PowerSelf-powered
Dimensions110 × 53 × 18 mm
Sensor-body length85 mm
Weight49 g
MaterialPC shell
ColorWhite
InstallationSurface mount; thin L-shaped adhesive base
Transmission frequency433 MHz RF
Stated outdoor rangeUp to 80 m in open conditions
Stated indoor rangeUp to 25 m
Working humidity≤99% RH
Operating temperature-20°C to 55°C
Storage temperature-20°C to 55°C
Durability>100,000 cycles

Maintenance, support & disposal

Battery-free operation removes routine battery replacement, but the installation still requires inspection and testing.

Routine care

  • Test the sensor during scheduled security-system inspections and after window servicing or renovation.
  • Check that the mounting base remains flush and firmly bonded.
  • Keep the triangular actuator contact area clean and unobstructed.
  • Clean only with a soft, dry or lightly damp cloth; do not use abrasive cleaners.
  • Replace damaged, cracked or mechanically sticking products.

Support and end of life

  • Support: [email protected]
  • Quote the product code, SKU, hardware revision and manual ID when requesting help.
  • Warranty terms and exclusions: One-year product warranty
  • Dispose of electronic products according to applicable local requirements.
  • The QR short URL must always resolve to the latest compatible guide.